At Agilx we throw around the term “MVP” a lot. But we aren’t referring to our most valuable player, we are referring to the “Minimum Viable Product” or the bare basics you need to make your software usable. Part of the agile methodology is building software in stages. The MVP is the very first stage, accomplishing your core goals with the forethought to add more features in the next releases. If you are new to the software game here are five simple steps to define your MVP.
1. What is the main goal of the product?
What is your amazing business idea and how is software going to help you? What is this product going to do and what kind of problem is it going to solve? Define the primary goal that needs to be accomplished to satisfy your customers.
2. How does the main process work?
Next, map out how the main goal will be accomplished by the user, this is the user flow. Imagine you are explaining to someone, who has never used your app before, the steps they need to take for a successful interaction, then make it as simple as possible. The idea is to think less about features and more about accomplishing specific tasks like, “search store”, “add to cart”, “checkout”, etc. Combining those (with a few steps in-between) define your process.
3. List features
Take a look at the tasks you came up with in the previous step. Now you need to list out the features that go along with each step.
Let’s take a look at the first one, “Search Store”. Your user will want to be able to type in a custom search, but we can consider adding some filter features. Sorting the results by price, color, size, reviews, etc.
How about a task to end the process, “checkout”. You may want to offer more than one way to pay for your items. Features could include, credit/debit, PayPal, Google Wallet, Venmo, gift certificates, coupons, etc.
Do that for each of your tasks and you’ll have your simple feature list built out in no time.
4. Prioritize features
We are getting closer to our MVP. Now we take a look at our feature list and decide which ones are vital to the process. Remember, some of these features can be added in with a second version of your software, right now we just want the basics. For each feature ask yourself a series of questions:
1. How important is it to finishing the process?
2. How often will it be used?
3. Will it be a popular feature?
4. Does it add value to the customer?
Let’s take a look at the features we added to the last task. Are all of those payment options necessary? With Credit/Debit the answer will be yes for our four feature questions. But what about Venmo? It’s becoming more popular and could add value but the majority of users probably won’t be using it very often. We can put that at the lowest priority for that task.
5. Define the MVP
After you have prioritized all your features it’s time to define the MVP. What is your top feature for each task? Grouping those together will give you your skeleton product, which should be built first. Often the skeleton product and the MVP are the same. However in some cases your MVP needs to be a bit more sophisticated than the skeleton. Study your prioritized list and choose which features are absolutely necessary, start with the top three for each task and test if that offers enough features for your users.
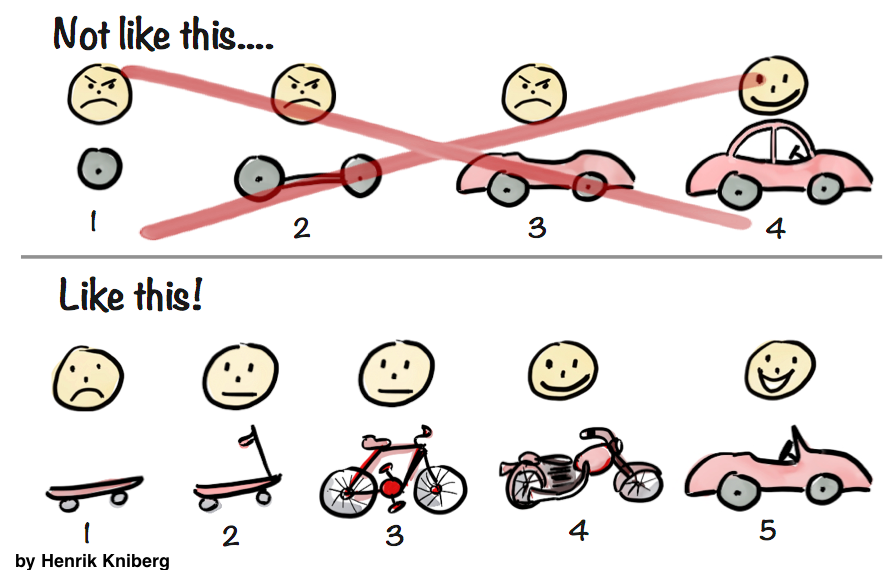
Often during planning it is easy to focus on all of the cool things you want your software to accomplish. It’s important to have a long term idea of the features you plan on giving to your users. The agile process keeps that in mind but adds features by version. The image at the top of this post gives a great illustration. If your goal is to travel somewhere you may want to end with a car. However starting with only the wheels doesn’t help you. A skateboard isn’t the final result but as a first phase it accomplishes your goal of traveling somewhere. The goal is still accomplished and with each version new features are added until the end result is that speedy car you wanted.